From Zoom 7.0 onwards, it is possible to give anonymous access to a collection of assets within a Zoom repository. However, a Zoom user account is needed to access everything else in Zoom. As an alternative to managing users in Zoom, users can also be managed using LDAP or Active Directory. In this article, we only talk about managing users in Zoom, along with roles and permissions.
How permissions, roles, and users are related
A permission is a set of actions allowed in Zoom. Permissions are fixed and may not be added, modified or deleted.
A role is a permission on any one or all projects. Each user in Zoom is mapped to a role along with one or more projects. For a user to be able to access a project, it should be mapped to the user as well as the role assigned to that user.
Learn about managing permissions, roles, and users below. For details about managing projects including assigning projects to users, go to Managing Projects.
What is in the box?
Permissions and roles are preset in Zoom. You cannot add, modify, or delete permissions but you can add, modify, and delete roles as needed.
The following permissions are available:
| Permission Name | Description |
|---|---|
| None | Has no access to any resource. |
| Distribute | Can only read items that are marked as published. |
| Review | Can only read items that are marked as published and marked for review. |
| Read | Has read-only access to assets. Cannot add, edit, or delete anything in Zoom (except collections) |
| Contribute | Can add and edit files. Cannot delete files. |
| Edit | Can add and edit files. Can also delete their own files. |
| Edit All | Can add, edit and delete files. |
| Administer | Can add, edit or delete files. Can also administer Zoom. This is the highest permission available in Zoom. |
Managing Users
Users in Zoom are either internal (the default) or external. External users are invited using email IDs to access one or more collections in Web Client. The creation and permission management of these external users is only done inside the collection(s) in Web Client. External users may later be converted to internal users or even deleted from the Web Management Console.
Managing Internal Users
In the Web Management Console, click Manage Accounts from under User Accounts node in the Admin Menu sidebar. This Manage Accounts page lists all internal users registered in your Zoom MAM Server.
Add Users
- OpenManage Accounts page by clicking under User Accounts node in the Admin Menu sidebar.

 Add User from the User Operations drop-down menu (alternatively, openCreate New Account page from under User Accounts node in the Admin Menu sidebar).
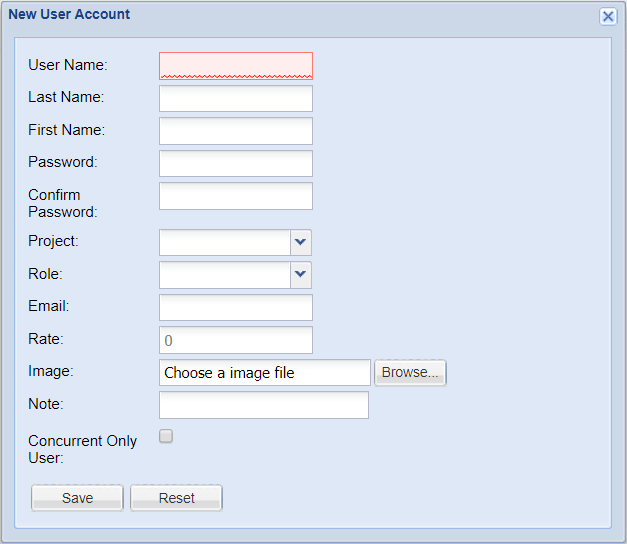
| Field | Example |
| User Name | jsmith |
| Last Name | Smith |
| First Name | John |
| Password | <password> |
| Confirm Password | <password> |
| Project | defproj |
| Role | webapprover |
| jsmith@example.com | |
| Rate | 0 |
| Image* | jsmith.jpg |
| Note | Remark |
| Concurrent Only User^ | – |
Concurrent-only users are those that can only login to the Zoom Server using web apps like WebVAB and Web Client. These users cannot log in to the Visual Asset Browser or the Zoom plugins.
Edit Users
- On theManage Accounts page (User Accounts > Manage Accounts), select a user row from the list of users.
- Click
 Edit User from the User Operations drop-down menu to view the Edit User dialog box (alternatively, double-click on the user row to view the same).
 - Update the values in the dialog box. The User Name, Project and Roles may not be changed.
Delete Users
- On theManage Accounts page (User Accounts > Manage Accounts), select one or more user rows from the list of users.
- Click
 Delete User(s) from the User Operations drop-down menu.
 - The selected users are deleted after confirmation.
View User Details
- On theManage Accounts page (User Accounts > Manage Accounts), select a user from the list of users.
- Click
 User Details on the User Operations drop-down menu.
 - The selected user’s details are displayed in the User Details window.
Managing External Users
In the Web Management Console, clickExternal Users from under User Accounts node in the Admin Menu sidebar. This External Users page lists all external users registered with your Zoom MAM Server.
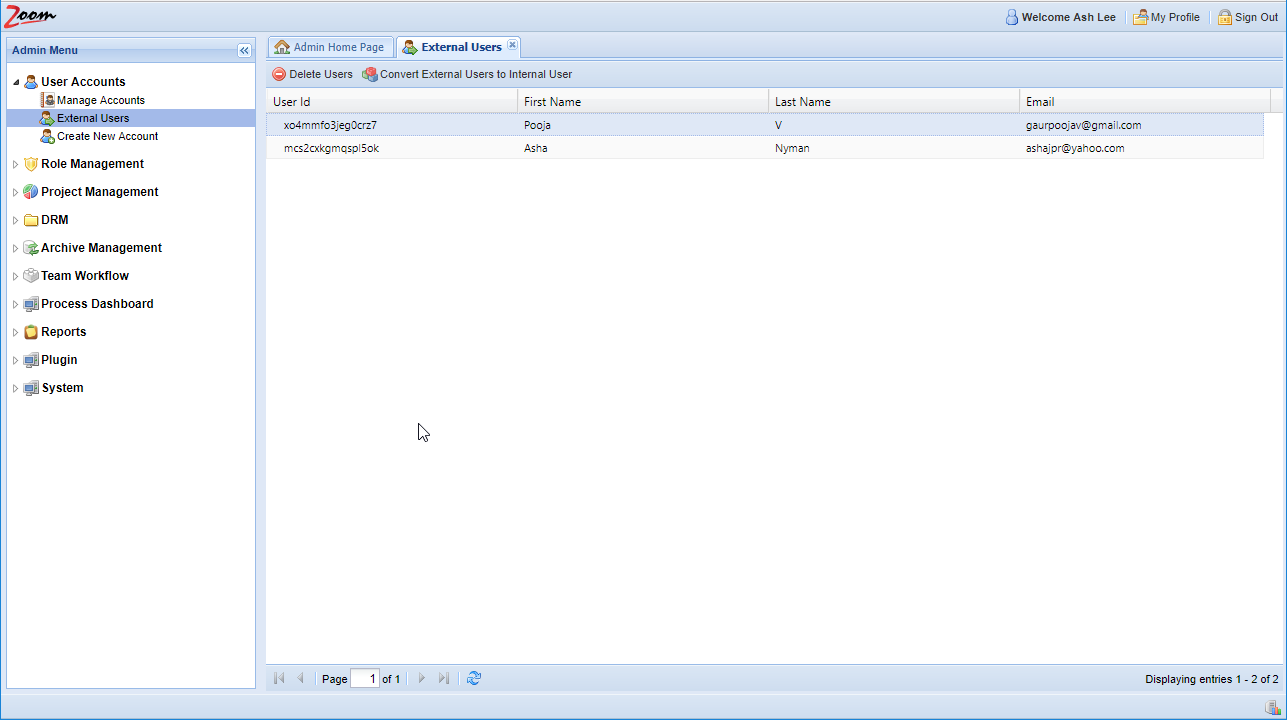
Convert External to Internal User
- On the
 External Users page (User Accounts > External Users), select one or more user rows from the list of users.
 - Click
 Convert External Users to Internal Users from the top bar.
 - The selected external users are converted to internal users after confirmation.
Delete Users
- On the
 External Users page (User Accounts > External Users), select one or more user rows from the list of users.
 - Click
 Delete Users from the top bar.
 - The selected external users are deleted after confirmation.
Role Management
Using a role, specific permissions can be set for a specific project. That way a user mapped to the role only has those permissions for that specific project. By default, however, roles are set to *, meaning that these permissions will apply to all projects.
Roles may be added, modified or deleted. Each role also needs a project assigned to it, otherwise, it is assigned for all projects. Finally, users are mapped to the role. In the Web Management Console, open Manage Roles from under Role Management node in the Admin Menu sidebar. This page lists all roles set in your Zoom MAM Server.
Edit Role
For a role, the project, permission or description may be edited. Click on the project, permission, or description for the role you wish to edit and enter/select the new value. Check these steps in detail below:
Set permission for a role
- On theManage Roles page (User Accounts > Role Management), click the Permission for the desired role. The permission will convert into a drop-down list.

 Save All button on the top right corner of the page.
Set project for a role
- On theManage Roles page (User Accounts > Role Management), click the Project for the desired role. The project will convert into a drop-down list.
- Select the desired project for this role from the Project drop-down box or type in * (to assign all projects to this role).
- ClickSave All button on the top right corner of the page.
Map Users to Role
- In the Web Management Console, open
 Map Users to Role from under Role Management node in the Admin Menu sidebar.
 - Under Role Name, select a role. The users mapped to this role are shown in the Selected Users list.
- To map one or more users, select these (Ctrl+click for multiple selections) from the All Users list. Similarly, to remove one or more users from the mapped list, select these from the Selected Users list.
- Click Add >> or Add All >> as needed. Similarly, click << Remove or << Remove All if needed.
- Click Save.
Add Role
- On theManage Roles page (User Accounts > Role Management), click
 Add Role. Keep in mind that if you want a role that is a subset of another role, then select that role’s row before clicking Add Role. If you click Add Role without selecting any row, then the new role is created at the root level as the other preset roles.
 - Enter the name for the new role in the Name of the Role box.
- Click OK. The new role is added to the list with permission as none and mapped to all projects.
- Under the Project column for that role, click to change the project from the drop-down.
- Under the Permission column for that role, click to change the permission from the drop-down.
- ClickSave All.
Delete Role
- On theManage Roles page (User Accounts > Role Management), select the role you would like to delete.
- Click
 Delete Role.
 - The selected role is deleted after confirmation.