Access to the Zoom repository is secured via a user sign-in. However, when an unattended process runs, such as third-party scripting, transcoding, shared hot-folder ingest or another complex ingest flow, no user may be available to perform the sign-in. This becomes even more relevant when a Single Sign-On (SSO) mechanism is used for authentication.
Presently, Zoom supports such unattended authentication by using stored credentials, i.e. username and password. In order to secure the usage of such credentials, it is recommended that special users are created for these processes. By differentiating these special users from human users, various advantages can be availed. These can be:
- Restrict access from specific IP addresses
- Restrict access to specific projects and roles
- Monitor audit logs for suspicious activity
Creating Special Users
Starting with version 7.6.1, the Zoom command-line client (zm CLI) supports creating special users using the admin command with the loadusers sub-command. Only Zoom administrator users i.e. superadmins, are authorized to issue the zm admin command. Further details about this command may be read here.
Example
The following command creates two special users, named transcoder1 and hotfolder.
zm -s server admin -c loadusers example.csv -p someproj -r developerdesignerContents of example.csv:
transcoder1,Passw0rd,One,Transcoder,trascoder.admin@company.com
hotfolder,hfP@ssword,Folder,Hot,hf.admin@company.com
Please make sure to save the CSV file without UTF-8 BOM. When choosing the file format to save from applications like MS Excel, choose CSV instead of CSV UTF-8; when using applications like Notepad++ choose UTF-8 instead of UTF-8 BOM.
See this article for more details: https://evolphin.com/help/administration-server/faq-answers/utf-8-bom-and-line-endings-faq/
Editing Special Users
The details of special users, such as password, email, and, names, may be edited via the User Account management interface on the Zoom Web Management Console. This is detailed in the article for Managing Internal Users.
Alternatively, the zm admin -c loadusers command may also be used with Zoom version 7.6.1 or higher. The form of the loadusers command is the same as the user creation above. The CSV file containing the user details to be edited need not contain columns after the last edit, i.e. it needs to contain the columns up till the last edited value. Similarly, the project and role options are optional.
Example
For editing the password of the transcoder1 user and the email address of the hotfolder user, the following command may be used.
zm -s server admin -c loadusers example-edit.csvContents of example-edit.csv:
transcoder1,tc1Passw0rd
hotfolder,,,,hotfolder-admin@company.com
Please make sure to save the CSV file without UTF-8 BOM. When choosing the file format to save from applications like MS Excel, choose CSV instead of CSV UTF-8; when using applications like Notepad++ choose UTF-8 instead of UTF-8 BOM.
See this article for more details: https://evolphin.com/help/administration-server/faq-answers/utf-8-bom-and-line-endings-faq/
Deleting Special Users
Starting with version 7.6.1, the zm CLI supports deleting special users using the admin command with the deleteusers sub-command. This requires providing an input CSV file containing those usernames which are to be deleted, one per row. The CSV file from the creation or editing steps may also be used.
Example
For deleting the transcoder1 and hotfolder users created above, the following command may be used.
zm -s server admin -c deleteusers example-del.csvContents of example-del.csv:
transcoder1
hotfolder
Please make sure to save the CSV file without UTF-8 BOM. When choosing the file format to save from applications like MS Excel, choose CSV instead of CSV UTF-8; when using applications like Notepad++ choose UTF-8 instead of UTF-8 BOM.
See this article for more details: https://evolphin.com/help/administration-server/faq-answers/utf-8-bom-and-line-endings-faq/
Control Access for Special Users
Assign specific project and roles
The projects and roles that a special user is authorized to access can be restricted in the same manner as normal users. This is typically done from the Zoom Web Management Console. This is detailed in the articles for Managing Projects and Role Management.
Alternatively, the zm admin -c loadusers command may also be used to set the project or role assignments, by supplying the -p project-names-list or -r role-names-list options, respectively. The command requires the usernames to be listed in a CSV file similar to user editing.
Restrict to specific IP addresses
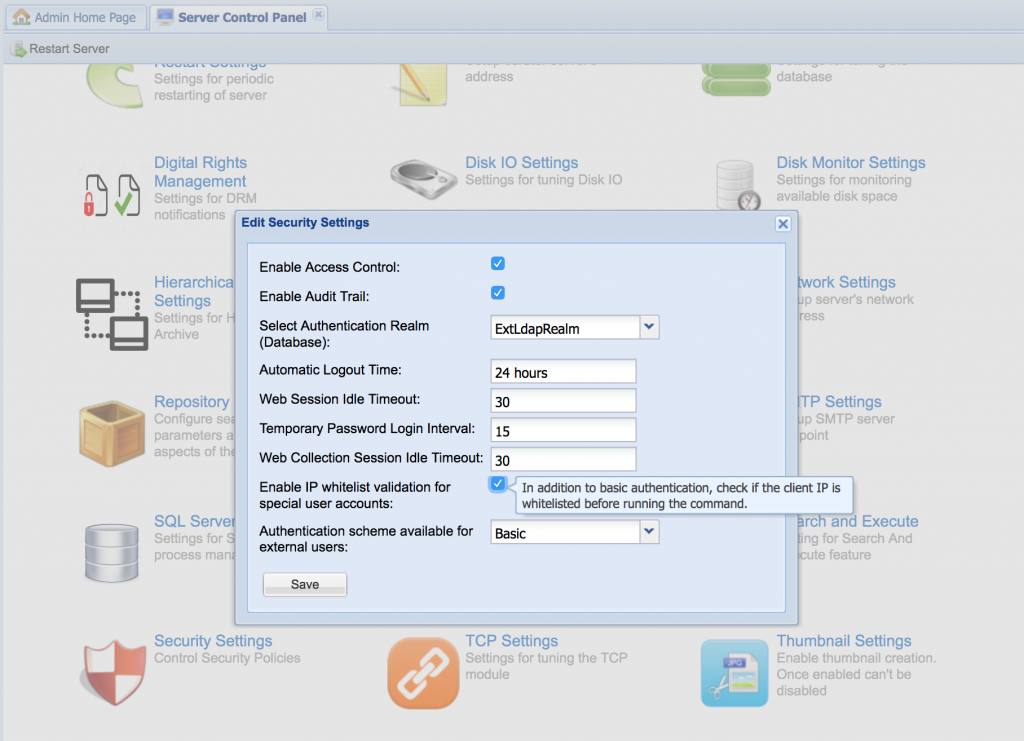
Sign-in for special users may be allowed only from a specified set of IP addresses. This is recommended as it reduces the risk of malicious attempts to gain access to the Zoom repository, from outside your organization’s secure network, using the credentials of a special user.
The Security Settings in the Server Control Panel of the Zoom Web Management Console provides the control to disable or enable this restriction for all special users.
Since Zoom version 7.1.0, the default set of IP addresses from which access will be granted, i.e. the white-list of IP addresses, consists of the configured Zoom servers, Preview servers, and, Curator servers.
To customise this set to allow access from other IP addresses, or disallow from some of the default IP addresses, a configuration file named system-user-IP.whitelist needs to be created in the [ZoomInstallDir]/conf/ folder of the Zoom server. This file must contain the IP addresses (IPv4 and IPv6 addresses, if any) of each of the allowed machines, including Zoom servers, Preview servers, and, Curator servers, as well as, loopback addresses. Each IP address must be listed on a separate line in the file, with no other characters except whitespace. The Zoom server needs to be restarted for any updates to this file’s contents to take effect.
Example
An example system-user-IP.whitelist file is given below, which grants access from the IP address 10.0.10.100; in addition to those of the Zoom server (10.0.10.20), Preview servers (10.0.10.30, 10.0.10.40) and Curator servers (10.0.10.30), as well as, the loopback i.e. local addresses of the Zoom server (127.0.0.1, 0:0:0:0:0:0:0:1, etcetera).
10.0.10.100
10.0.10.20
10.0.10.30
10.0.10.40
127.0.0.1
  0:0:0:0:0:0:0:1
  0:0:0:0:0:0:0:1%lo0
  fe80:0:0:0:0:0:0:1
  fe80:0:0:0:0:0:0:1%lo0
The default white-listed IPs can also be viewed in the server_log file just after server start-up, by setting the log level to CONFIG or lower. For example:
CONFIG: Thu, 3 Sep 2020 20:03:23.170 PDT  [ServerRemoteEndpointValidator.getInstance Zoom Main Thread-1] Initialized instance: ServerRemoteEndpointValidator {
        ipWhitelist = SystemUserIPWhitelist {
        whitelist = [0.0.0.0, 127.0.0.1, 0:0:0:0:0:0:0:1, fe80:0:0:0:0:0:0:1, 0:0:0:0:0:0:0:1%lo0, fe80:0:0:0:0:0:0:1%lo0, 10.0.10.20, 10.0.10.30, 10.0.10.40],
        initializer = DEFAULT
}
}