After the EZ Updater is set up, a lot more features are available for use by the EZ Admin. In the initial setup as shown here, one EZ Admin was registered for the EZ Updater, EZ Updater settings were saved, EZ Client bits were configured and then uploaded on EZ for use by the clients. Let us look at all the features of EZ Updater available to an EZ Admin.
The recommended settings are to have the EZ Updater check for updates every day and install updates automatically.
Before proceeding, ensure that you have installed and configured EZ Updater and EZ Clients as shown here.
Zoom Builds
The Zoom Builds tab opens the page to show the Zoom builds downloaded on the EZ Updater.
Manage Machines
The EZ Client machines managed by this EZ Updater are listed under the Managed Machines page.
- Open EZ Web portal in a web browser and log in.
- Click Managed Machines in the top menu bar.
This page shows the details of the machines which are managed by this EZ Updater. The EZ Admin can add a machine, edit existing machines, or delete them. By default, the current EZ Updater machine will also be listed here. If you click on any row, the details for that machine, like installation type (Zoom Server/ Zoom Client), version, Zoom installation path and last Zoom updated time, are shown below the machines list.
If an EZ Client machine is not on this list, it is automatically added anytime it checks for update (manually or as per schedule).
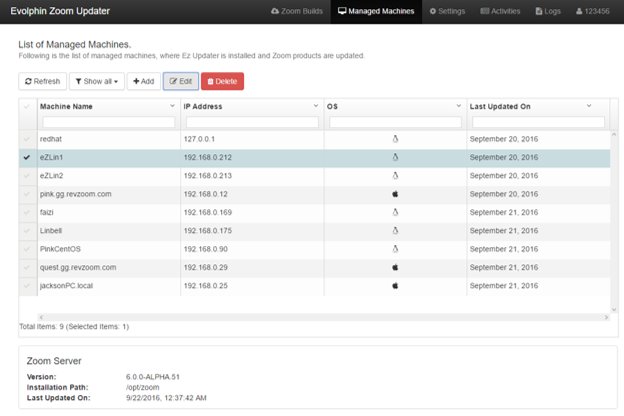
These options are available on the Managed Machines page.
Add Machine: Adding a machine is not available for now.
Edit Machine Details: The EZ Admin may change the machine details by clicking Edit. If the IP address or hostname are modified, the other details will be fetched again. The EZ Admin may choose to edit the name of the Managed machine. This name is only for identification by the EZ Updater.
View Activities
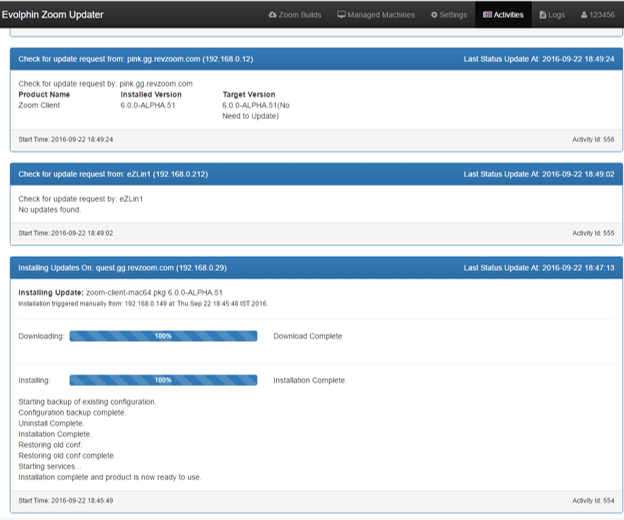
All activities associated with EZ may be tracked on the Activities page. This is a log of all the activities happening within the EZ Updater on this machine. A brief description of the activity, start time, last updated time of activity, address from which the request originated, steps executed during the activity and progress (if available) as well as the Activity ID are shown here.
View Logs
Logs are maintained by all EZ machines. These logs are stored in [EvolphinZoomUpdaterData]\logs folder. The logs may also be viewed in the EZ Web portal. By default, the logs view displays only the last 1Mb of logs and keeps appending it at the end as soon as new log entries are generated.
- Open EZ Web portal in a web browser and log in.
- Click Logs in the top menu bar.

These options are available on the Logs page:
Full logs: Click Full logs to display the logs in its entirety. The size of logs being skipped is also displayed next to it.
Download Full Logs: Click Download Full Logs to download all logs as a zip file.
Log level: Select the desired log level to display. ALL will display complete logs.
Upload EZ
The Upload EZ page is used to upload EZ Client bits that EZ Clients can install. These builds are set up during the first-time configuration of EZ. If you need to set up additional EZ Clients or know more about each option on the Upload EZ page, see in detail below.
EZ Settings
The Settings page is used to configure the EZ Updater. These options are configured while setting up EZ and do not need to be changed later. In case you need to update any settings later, then you need to login to the EZ Web Portal as an EZ Admin.
Register User
To register a new EZ Admin user, open the EZ Web Admin portal.
Reset password
To reset the password:
- Open EZ Web portal in any web browser.
- Click Reset Password on the Login page.
- Enter username.
- Enter a new password and confirm it.
- Enter the master password. Check for the master password from
ez-updater.xml. To know more about the master password, check new user registration above.