
Install Adobe Extension
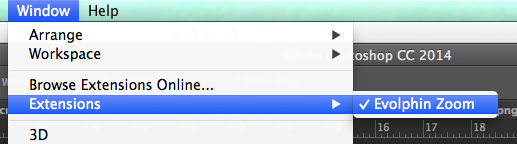
If you do not see an Evolphin Zoom panel under Window > Extensions > Evolphin Zoom, install the plugin manually using Installing Creative App Plugin .
Structuring Folders
Evolphin Zoom is able to handle assets that are both individual assets and entire folders. In InDesign, layouts can encompass a variety of different images or other documents that are linked. Links that are contained within a sub-folder next to the INDD folder will perform a relative link. As a result, it is suggested that when possible to contain InDesign projects as a folder.
When checking out an InDesign document, it is suggested to check-out the containing folder. That way, all of the related assets could be checked out at the same time.

When you are checking an InDesign document, it is then advised to Checkin parent directory.
Links in InDesign
In InDesign, layouts can encompass a variety of different images or other documents that are linked. When that linked file is modified, InDesign notifies that user that the link has been updated. Zoom can read the linked assets inside of an InDesign document automatically. Assets are automatically linked in Zoom so you can see which assets derivatives there are of that original asset.
Link Assets in InDesign
An asset can be linked by dragging and dropping into InDesign.
- In Asset Browser, search for the asset you would like to place into your InDesign document.
- Check-out the asset.
- Drag-and-drop the asset from Asset Browser to the appropriate place in your InDesign layout.
Drag-and-drop to InDesign
When you check-in your asset, you can then see the links in the Links Panel in Asset Browser.
Checkin Assets
There are a variety of different ways assets can be checked into Zoom. Assets can be checked into Zoom directly from within a Creative App without having to depend on the Asset Browser. For additional information on how to Check-in, see Check-in Assets .
Check-in Unversioned File
- Save your current document.
- Open the Evolphin Zoom panel by navigating to Window > Extensions > Evolphin Zoom.
- Zoom 7.0: Click Sync.
- Choose Server URL if prompted.

Check-in Versioned File
In order to check-in existing assets into Zoom via the Creative App panel, your file must already be saved on your computer.
- Save your current document.
- Open the Evolphin Zoom panel by navigating to Window > Extensions > Evolphin Zoom.
- Zoom 7.0: Click Sync.
- Fill out any required metadata or keyword values.
- Click Check-in.
Check-in Options
Option | Description |
---|---|
Expand/Collapse tree | Click to toggle between viewing expanded or collapsed folders in the check-in window. By default, folders are viewed as expanded. |
Show unversioned | Click to toggle between viewing only the project/document files or all unversioned files in the parent folder. |
Check-in Parent Folder | Checks in the folder that contains the current document. |
Check-in linked assets | Click to toggle between checking-in linked assets along with the project/document check-in. |
Exclusive only | Click to toggle between checking-in only the project/document and their linked files but not any other unversioned files. |
Convert to working copy | Copies the file from its current location to its location in the default working copy folder on your computer. |
Metadata selection | If enabled, choose/enter values for mandatory metadata fields or select from a preset from the preset drop-down. |
Keep files locked | Zoom automatically unlocks assets when performing a Check-in. Enabling this will keep the asset locked after check-in. |
Change thumbnail | Zoom will search for a _tb file in the same directory as the asset. |
Quick Checkin*
*Not available in Zoom 7.0+
Assets can also be checked into Zoom using the Quick Checkin button in the Creative App panel as described here:
Quick Checkin allows users to quickly check-in assets to a specified location in Zoom. This will also forego any required metadata dialogs. This is useful particularly in environments such as news organizations that need to quickly import items into Zoom and perform organization later. Quick Checkin must be configured in order to work properly.
Quick Checkin
Prerequisites:
- Open Settings dialog from Z-Icon in the system tray.
Settings Dialog - Set default zoom server and make sure to select Always Use Default.
Default Server - Open zoom.properties file from $HOME/.zm
For Example: /Users/joe/.zm/zoom.properties - Add default Quick Checkin destination folder.
Syntax: QUICK_CHECKIN_DEST=/defproj
/defproj is the path on zoom server where Quick Checkin files will go to. - The Quick Checkin dialog will not appear by default. Add SHOW_QUICK_CHECKIN property in zoom.properties file, if you want to the Quick Checkin dialog to appear.
Syntax: SHOW_QUICK_CHECKIN=TRUE - If mandatory metadata is enabled on zoom server, make sure to save the default metadata template from checkin dialog
Launch Quick Checkin:
Quick Checkin allows users to quickly check-in assets to a specified location in Zoom. This will also forego any required metadata dialogs. This is useful particularly in environments such as news organizations that need to quickly import items into Zoom and perform organization later. Quick Checkin must be configured in order to work properly.
Quick Checkin
Prerequisites:
- Open Settings dialog from Z-Icon in the system tray.
Settings Dialog - Set default zoom server and make sure to select Always Use Default.
Default Server - Open zoom.properties file from $HOME/.zm
For Example: /Users/joe/.zm/zoom.properties
- Add default Quick Checkin destination folder.
Syntax: QUICK_CHECKIN_DEST=/defproj
/defproj is the path on zoom server where Quick Checkin files will go to. - The Quick Checkin dialog will not appear by default. Add SHOW_QUICK_CHECKIN property in zoom.properties file, if you want to the Quick Checkin dialog to appear.
Syntax: SHOW_QUICK_CHECKIN=TRUE
- If mandatory metadata is enabled on zoom server, make sure to save the default metadata template from checkin dialog
Launch Quick Checkin:
Smart Copy/Clone Project
Within Zoom, creating copies of files is easy using Smart Copy. Unlike conventional copying of files which takes up additional data, creating a Smart Copy allows a file to be copied and edited without having to duplicate data on the server. You can create smart copies of a file or an entire folder. For additional information on Smart Copy, see Smart Copy Assets .
- Save your current document.
- Open the Evolphin Zoom panel by navigating to Window > Extensions > Evolphin Zoom.
Window > Extensions > Evolphin Zoom - Zoom 7.0: Click Fly-out menu > Clone Project
- Choose Server URL.
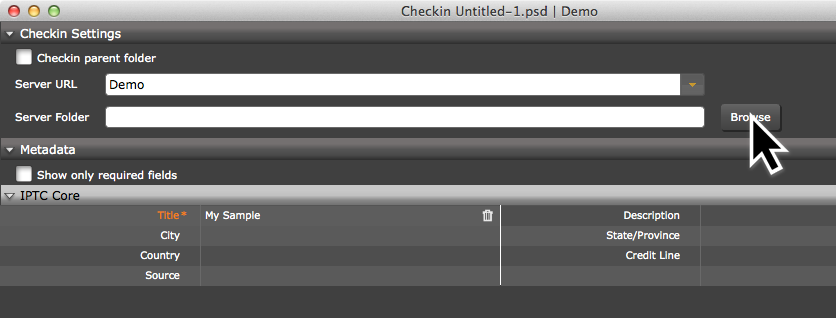
Check Browse – Checkin Dialog - Click Browse to choose the location in Zoom to checkin the asset.
- Fill out any required metadata or keyword values.
- Enable or disable Convert to working copy.
- Click Smart Copy.
Lock/Unlock
Lock is a feature in Zoom that allows you to restrict who is working at a file at one time. This helps communicate to users which files have been delegated to which users at a time. When a file is locked, other users in Zoom are not able to commit a new version of the file until you have released the lock on the file.
When you Checkin an asset, the asset is automatically unlocked unless you explicitly check Keep files locked in the Checkin dialog.
Lock
- Save your current document.
- Open the Evolphin Zoom panel by navigating to Window > Extensions > Evolphin Zoom.
Window > Extensions > Evolphin Zoom - Zoom 7.0: Toggle Lock
- Choose Server URL.
Check Browse – Checkin Dialog
Release Lock
Revert/Revert Project
When editing an asset inside of Zoom, Revert allows you to revert back to the last revision checked out from the Zoom Server. This will remove any of the modifications that were applied to the asset.
Revert Changes
Update/Sync
When a file is changed on the Zoom Server, for example a new version is created, the file on your computer now is older than the latest version on the server and needs to be updated. Updating the files will update the file if there is a newer version or move it if it was moved on the Zoom Server.
Update Asset
Task Manager
The Task Manager allows users who have the Workflow module to accept and submit tasks assigned to them within a Workflow Job. The Task Manager can be launched directly from with the Creative App Plugin.
Show in Asset Browser/View in Zoom
The Show in Asset Browser button in the Creative App Plugin allows users to navigate to the asset they have open in the Creative App within Asset Browser.
Show Current Asset in Asset Browser
Incoming Changes
Incoming Changes allows you to view what working copies on your computer currently have never revisions on the Zoom Server. Accessing Incoming Changes is possible directly through the Creative App Panel.
Revert Changes
- Open the Evolphin Zoom panel by navigating to Window > Extensions > Evolphin Zoom.
Window > Extensions > Evolphin Zoom - Click Incoming Changes.
Zoom Repository
The Zoom Repository button in the Creative App Plugin will allow you to launch the Zoom Repository from directly within your Creative App.
Launching Zoom Repository
- Open the Evolphin Zoom panel by navigating to Window > Extensions > Evolphin Zoom.
Window > Extensions > Evolphin Zoom - Click Zoom Repository.
Status
The Status button shows the detailed current status of a working copy on your computer locally and on the Zoom Server. This includes information such as File Status, Size, Modification Date, etc.
View Asset Status
Reveal/View in Explorer/Finder
Reveal in Explorer / Reveal in Finder button in the Creative App Plugin navigates to the working copy within Windows Explorer or the Apple Finder on your computer.