Towards fortifying Zoom further against security vulnerabilities, from Zoom 7.0 onward we support SSL for desktop Zoom applications such as Asset Browser. This is in addition to the already available SSL support on Zoom Preview Server and Zoom MAM Server.
From Zoom 7.1 onwards, additional security measures have been added to the way SSL is set up. Now, during an SSL handshake, a hostname check is also performed. There is no change in the commercial SSL setup due to this modification.
However, additional setup is needed for self-signed certificates. You have two options here:
- Either, you need to create a new self-signed certificate that has all the needed hostnames defined in it. Click here to see an example of creating a new self-signed certificate to accommodate these changes.
- Or, you could bypass the hostname check altogether. This method is described in the Certificate Setup below.
Enable SSL on each Zoom Server instance
To enable SSL in Zoom desktop apps, do the following for each of the Zoom Server and Preview Server. Ignore the HADR peer section if HADR is not in use. If you have already enabled Zoom SSL support for Web Apps, some of the settings below may already be in effect.
On each Zoom Server
- On the Zoom Server, navigate to the conf folder in the Zoom Install directory (For Windows – [ZoomInstallDir]\conf and for Linux – [ZoomInstallDir]/conf).
- Open
server.xmland update the following tags:- Under
<networkspec>, set<securePortEnabled>tag as true - Under
<networkspec>, set<securePort>tag as 9880
- Under
<webserverspec>, set<useSslForDesktopClient>tag as true - Under
<webserverspec>,<sslPort>check tag is 9443 - Under
<webserverspec>, set<ssl>tag as true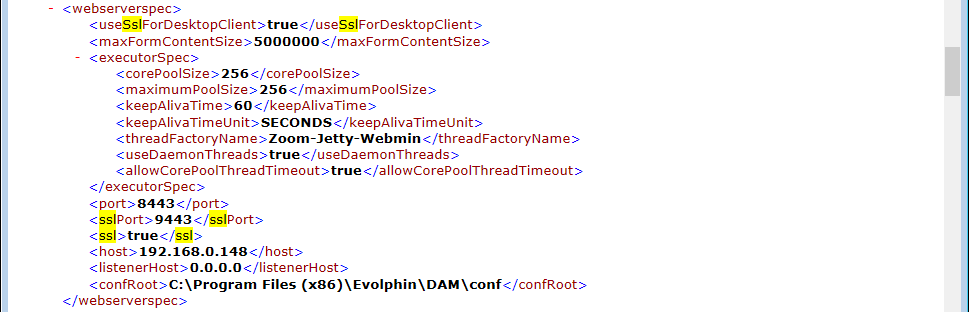
- If the LDAP server is not in use then skip this step. If LDAP server is in use, then under
<ldapspec>, set<authspec><ldapspec>, set<useSsl>tag as true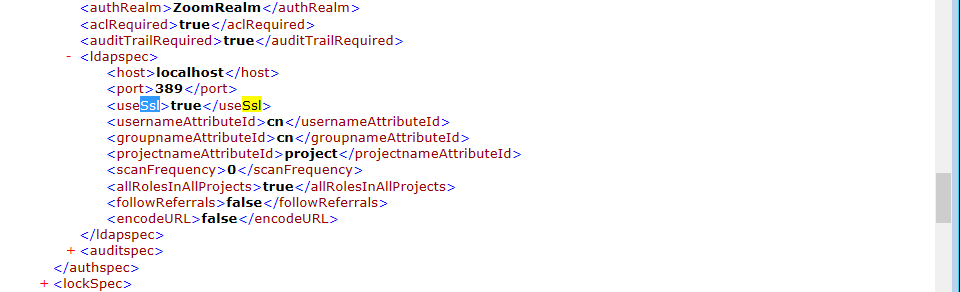 If any of the tags specified above are not found, please add the tag under that relevant section.
- Under
- Save changes to the
server.xmlfile.
On each Preview Server/Transcoder/Ingest Server
- On the Preview Server, navigate to the conf folder in the Zoom Install directory (For Windows – [ZoomInstallDir]\conf and for Linux – [ZoomInstallDir]/conf).
- Open
server.xmland update the following tags:- Under
<reviewserverspec><ServerConnection>, set<sslPort>tag as 8973 - Under
<reviewserverspec><ServerConnection>, set<enableSsl>tag as true - Under
<reviewserverspec>, set<proxySslPort>tag as 8874 - Under
<reviewserverspec>, set<useSslForDesktopClient>tag as true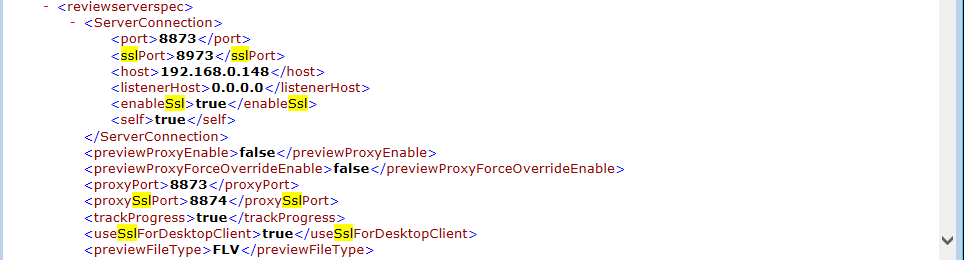
- Under
- Save changes to the
server.xmlfile. - Now, navigate to the conf folder in Zoom Install directory (For Windows – [ZoomInstallDir]\conf and for Linux – [ZoomInstallDir]/conf).
- Open
preview-server.xmland update the tag <ZoomServerHostPort> to use https (eg. <ZoomServerHostPort>https://[ZoomServerIP]:9880</ZoomServerHostPort>). Save changes.
On the Curator
- On the Curator, navigate to the conf folder in the Zoom Install directory (For Windows – [ZoomInstallDir]\conf and for Linux – [ZoomInstallDir]/conf).
- Open
server.xmland update the following tags:- For Zoom 7.3 onwards:
- Under
<curatorSpec><curatorConnection>, set<useSsl>tag as true - Under
<curatorSpec><curatorConnection>, set<sslPort>tag as 8984
- Under
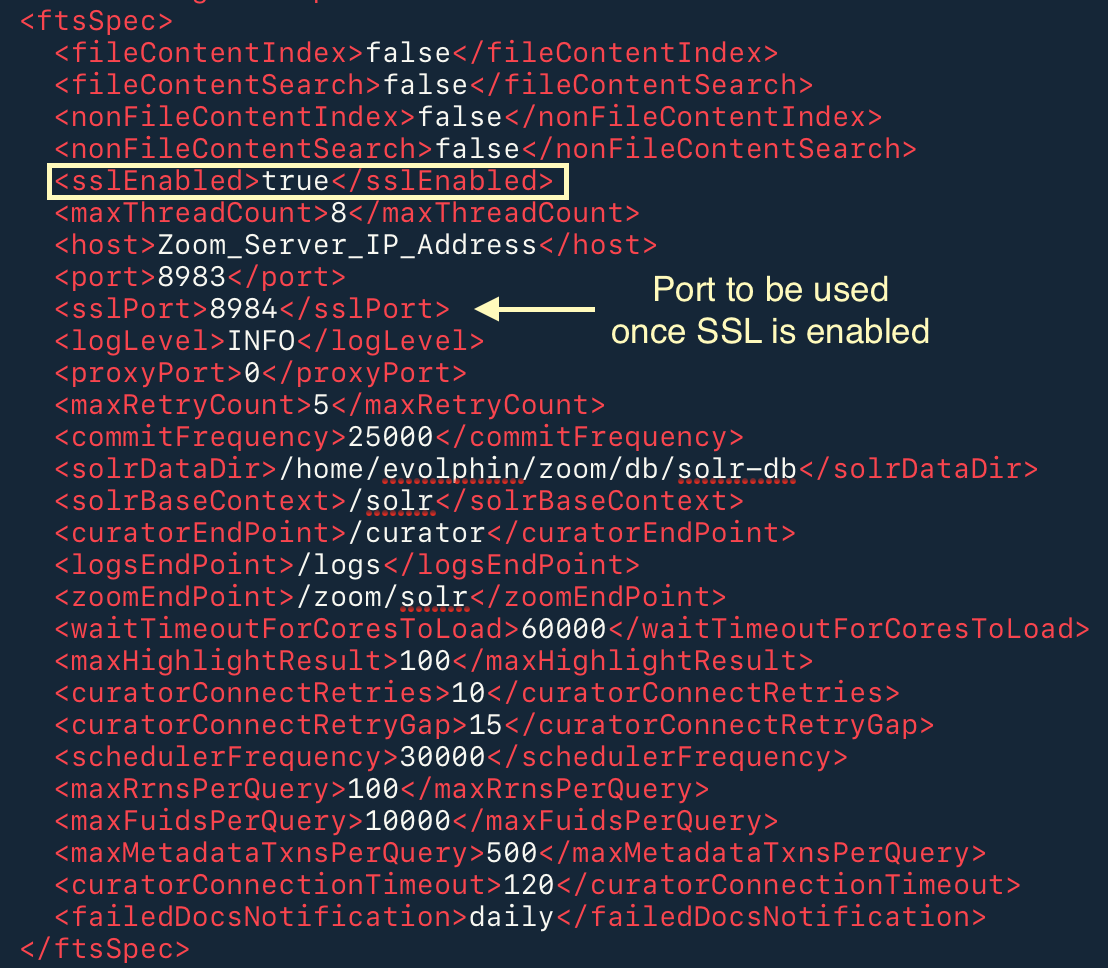
- For Zoom versions before 7.3:
- Under
<ftsSpec>, set<sslEnabled>tag as true - Under
<ftsSpec>, set<sslPort>tag as 8984
- Under
- For Zoom 7.3 onwards:
- Save changes to the
server.xmlfile.
On each Zoom HADR Peer
- On each Zoom HADR Peer, navigate to the conf folder in the Zoom Install directory (For Windows – [ZoomInstallDir]\conf and for Linux – [ZoomInstallDir]/conf).
- Open
server.xmland update the following tags:- Under
<hadrspec><hadrGroup><peer><networkSpec>, set<securePortEnabled>tag as true - Under
<hadrspec> <networkSpec>, set<securePort>tag as 9880 - Under
<hadrspec><hadrGroup><peer><networkSpec>, set<hadrPortSecured>tag as true - Under
<hadrspec><hadrGroup><peer><networkSpec>, set<fileTransferProtocol>tag as https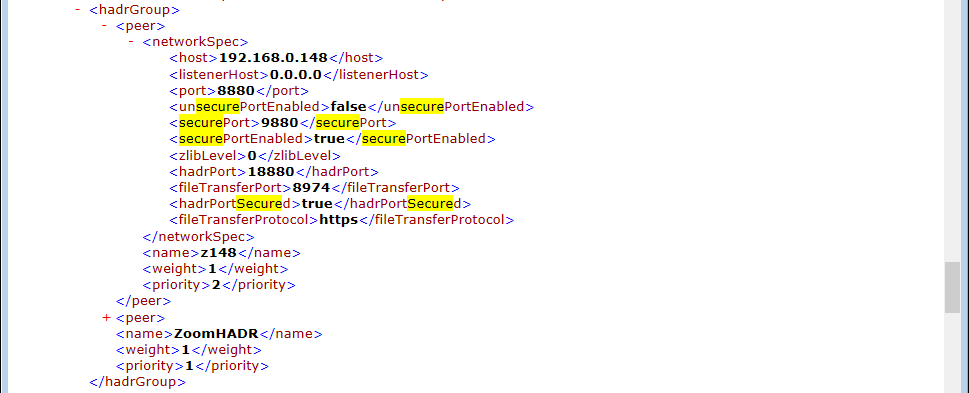
- Under
- Save changes to the
server.xmlfile. - Again, on each Zoom HADR Peer, navigate to the conf folder in Zoom Install directory (For Windows – [ZoomInstallDir]\conf and for Linux – [ZoomInstallDir]/conf).
- Open
filetransfer-spec.xmland update the following tags:- Set
<sslPort>tag as 8874 - Set
<ssl>tag as true
- Set
- Save changes to
filetransfer-spec.xmlfile.
Certificate Setup
With a commercial certificate
Copy the certificate file to the conf folder in the Zoom Install directory (For Windows – [ZoomInstallDir]\conf and for Linux – [ZoomInstallDir]/conf) for each server machine.
Now, save the password provided with the SSL certificate in each of the Zoom modules as follows:
wrapper.java.additional.12=-Dzoom.ssl.keystore.pass=<actual password>, look for the property name, Dzoom.ssl.keystore.pass.Zoom Server
- From the conf folder, open file
wrapper.conf - Set these two properties:
wrapper.java.additional.12=-Dzoom.ssl.keystore.path=<SSL Certificate file location relative to the Zoom Install directory>wrapper.java.additional.13=-Dzoom.ssl.keystore.pass=<actual password> - Save and close the file.
Preview Server/Transcoder/Ingest Server
- From the conf folder, open file
preview-server.conf - Set these two properties:
wrapper.java.additional.12=-Dzoom.ssl.keystore.path=<SSL Certificate file location relative to the Zoom Install directory>wrapper.java.additional.13=-Dzoom.ssl.keystore.pass=<actual password> - Save and close the file.
Curator
- From the conf folder, open file
curator-server.conf - Set these two properties:
wrapper.java.additional.12=-Dzoom.ssl.keystore.path=<SSL Certificate file location relative to the Zoom Install directory>wrapper.java.additional.13=-Dzoom.ssl.keystore.pass=<actual password> - Save and close the file.
File Transfer Server (HADR)
- From the conf folder, open file
hadr-filetransfer.conf - Set these two properties for the location:
wrapper.java.additional.12=-Dzoom.ssl.keystore.path=<SSL Certificate file location relative to the Zoom Install directory>wrapper.java.additional.13=-Dzoom.ssl.keystore.pass=<actual password>Set these properties for each HADR peer. - Save and close the file.
Client Systems
No setup needed.
With a self-signed certificate (not recommended)
For each server in your Zoom setup (Zoom MAM Server, Preview Server, all HADR peers, Ingest Server, Transcoders, and other such servers) and each Zoom Client machine, set up the following:
- Copy the certificate file to the conf folder in the Zoom install directory (For Windows – [ZoomInstallDir]\conf and for Linux – [ZoomInstallDir]/conf).
- The certificate information also needs to be set up in the zoom.properties file for each of these machines:
- From the user folder (../users/$user/.zm/), open
zoom.properties(make sure the hidden files are visible to view the .zm folder). - Set these two properties:
ZOOM_SSL_TRUSTSTORE_PATH=<SSL Certificate file's location inside the Zoom Installation Folder>ZOOM_SSL_TRUSTSTORE_PASSWORD=<actual password> - Save and close the file.
- From the user folder (../users/$user/.zm/), open
The location of the certificate file and its Keystore password also needs to be saved on each of the Zoom machines as shown below:
Zoom Server
- From the conf folder, open file
wrapper.conf - Set these two properties:
wrapper.java.additional.11=-Dzoom.ssl.keystore.path=<SSL Certificate file location relative to the Zoom Install directory>wrapper.java.additional.12=-Dzoom.ssl.keystore.pass=<actual password> - Save and close the file.
Preview Server/Transcoder/Ingest Server
- From the conf folder, open file
preview-server.conf - Set these two properties:
wrapper.java.additional.11=-Dzoom.ssl.keystore.path=<SSL Certificate file location relative to the Zoom Install directory>wrapper.java.additional.12=-Dzoom.ssl.keystore.pass=<actual password> - Save and close the file.
Curator
- From the conf folder, open file
curator-server.conf - Set these two properties:
wrapper.java.additional.11=-Dzoom.ssl.keystore.path=<SSL Certificate file location relative to the Zoom Install directory>wrapper.java.additional.12=-Dzoom.ssl.keystore.pass=<actual password> - Save and close the file.
File Transfer Server (HADR)
- From the conf folder, open file
hadr-filetransfer.conf - Set these two properties:
wrapper.java.additional.11=-Dzoom.ssl.keystore.path=<SSL Certificate file location relative to the Zoom Install directory>wrapper.java.additional.12=-Dzoom.ssl.keystore.pass=<actual password>Set these properties for each HADR peer. - Save and close the file.
Client Systems
As described above, the certificate needs to be copied to the conf folder in the Zoom install directory (For Windows – [ZoomInstallDir]\conf and for Linux – [ZoomInstallDir]/conf). The certificate information also needs to be set up in the zoom.properties file for each client machine in your Zoom setup.
- From the user folder (../users/$user/.zm/), open
zoom.properties(make sure the hidden files are visible to view the .zm folder). - Set these two properties:
ZOOM_SSL_TRUSTSTORE_PATH=<SSL Certificate file's absolute location>ZOOM_SSL_TRUSTSTORE_PASSWORD=<actual password> - For Zoom 7.1 onwards, if you are setting up a new SSL certificate without hostnames, then add a new property:
DISABLE_SECURE_HOSTNAME_VERIFIER=trueWhen upgrading to Zoom 7.1+, it is recommended to generate a new self-signed certificate that also has hostname definitions. You do not need to follow step 3 in this case.
If you want to proceed without hostname definitions, then you would need to skip hostname check on each Zoom Client. This is done in step 3 above. - From Zoom 7.6.1 onwards, if you are using a self-signed SSL certificate with the AWS C3 on a Zoom Client machine, then add a new property:
SELF_SIGN_SSL_CERT=true - Save and close the file.