Zoom VideoFX 2.0 is a proxy-based high-res asset manager that works with a third party transcoder, Telestream Vantage. It also supports external archives to be integrated into user-defined workflows. At the basic level, a VideoFX 2.0 setup should have an Ingest Server to interact with the PSAN and a Transcoder to interact with the third-party Vantage machine. The Ingest Server acts as a single point that accesses PSAN for the rest of the network. This makes your PSAN more secure.
Components
The components and their interactions in VideoFX 2.0 are shown below:
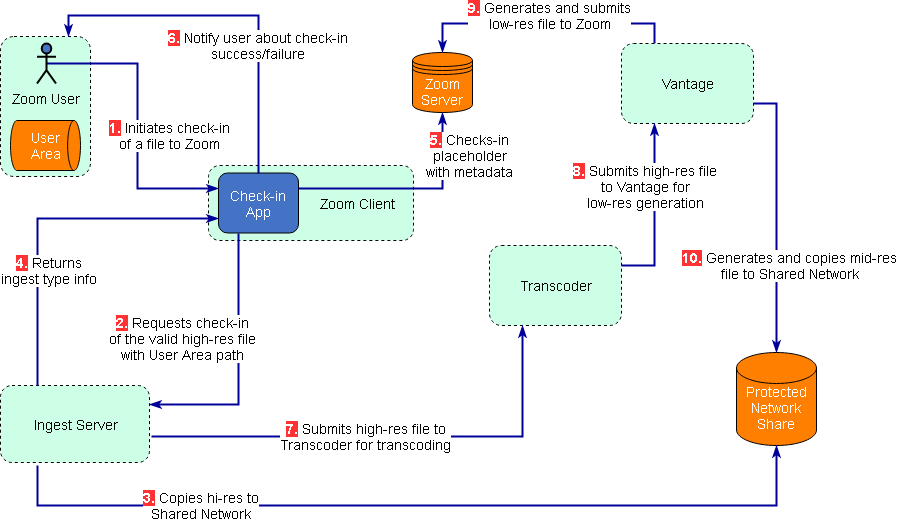
In this diagram, the components are:
- Zoom User: an authenticated user of Zoom that intends to check-in a valid high-res file into the Zoom MAM repository.
- User Area: a Zoom User’s personal storage from where files are submitted for check-in. Also referred to as ‘USAN‘.
- Zoom Client: any one of Zoom desktop clients or Zoom app plugins that can invoke the Check-in App.
- Check-in App: the module inside a Zoom Client that handles the check-in of files into the Zoom repository.
- Ingest Server: an intermediate server that is responsible for ingesting high-res files into the PSAN. Typically, the Zoom Preview Server co-hosts the Ingest Service. The Ingest Server copies the high-res asset to the Protected Network Share and also submits it to Vantage for transcoding.
- Transcoder: a machine running Zoom Preview Server instance that either submits files to the Vantage machine for transcoding or transcodes them using preconfigured converters like Redline.
- Protected Network Share: a shared network mount location where all high-res files are stored. It also stores mid-res files coming from Vantage. To know more about how to set up this protected network share, click here. Also referred to as ‘PSAN‘.
- Vantage: a Telestream transcoder that will convert the high-res file to lower resolution versions. From Zoom 7.3 onwards, this machine does not need a Zoom service installed on it.
- Zoom Server: the Zoom MAM Server in this setup that holds the repository.
System Requirements
| Zoom MAM Server | Ingest Server | Transcoder | Vantage | Zoom Client | |
| OS | Linux (RHEL 7+) or Windows Server 2012+ | Linux (RHEL 7+) or Windows Server 2012+ | Linux (RHEL 7+) or Windows Server 2012+ (if using Redline) | As required by Telestream |
Windows 7+ macOS Sierra 10.12.6+ |
| User Area (USAN) | Write access | Write access | — | — | Write access |
|
Protected Shared Network (PSAN) | Write access (for Archive) | Write access | Write access | Write access | Read access |
In addition to these requirements, also check for:
- Your basic Zoom setup is up and running. Check instructions about installing/upgrading your Zoom Server.
- VideoFX and Vantage licenses on Zoom: check if you obtained the necessary licenses for VideoFX and Vantage from Evolphin support.
- Plan for one or more geographical demarcations within your entire Zoom network, called locations, that may each use different transcoders to convert high-res files based on different rules. You could use Vantage, VideoLX, or other media converters for such transcoding at individual locations. You would need appropriate licenses for Vantage or VideoLX for each location that you want to set up.
- Vantage setup instructions from Telestream: set up your Vantage machine per Telestream’s instructions here.
- Optionally, plan out the metadata schema to be used as the folder structure for saving high-res assets as well as New Project (Adobe CC plugins) parent folder. For e.g, you could use metadata fields ‘Show’, ‘Season’ and ‘Episode’ to save high-res assets in the folder structure as shown below:

- Decide on which file types need transcoding from Vantage or a media converter. Also, plan for which type of files would be considered high-res and which should be ingested directly. These will be stored later as Ingest Rules.
- Choose a machine to install SQL Server or use an existing SQL Server for process reporting.
- Plan on having an exclusive Zoom user account for the Transcoder. One Zoom user account per Transcoder will be needed.
After checking these requirements, follow these steps to continue:
- Check VideoFX and Vantage licenses on Zoom Server
- Set up shared network locations
- Define metadata schema on the Zoom server
- Set Ingest Rules on Zoom Server
- Location setup
- Allocate licenses for locations
- Set up a SQL database
- Set up Transcoder for each location
- Register Transcoder for each location with your Zoom Server
- Set up Ingest Server for each location
- Set up Vantage
- Set up Zoom Clients
- Validate your VideoFX 2.0 setup
Check VideoFX and Vantage licenses
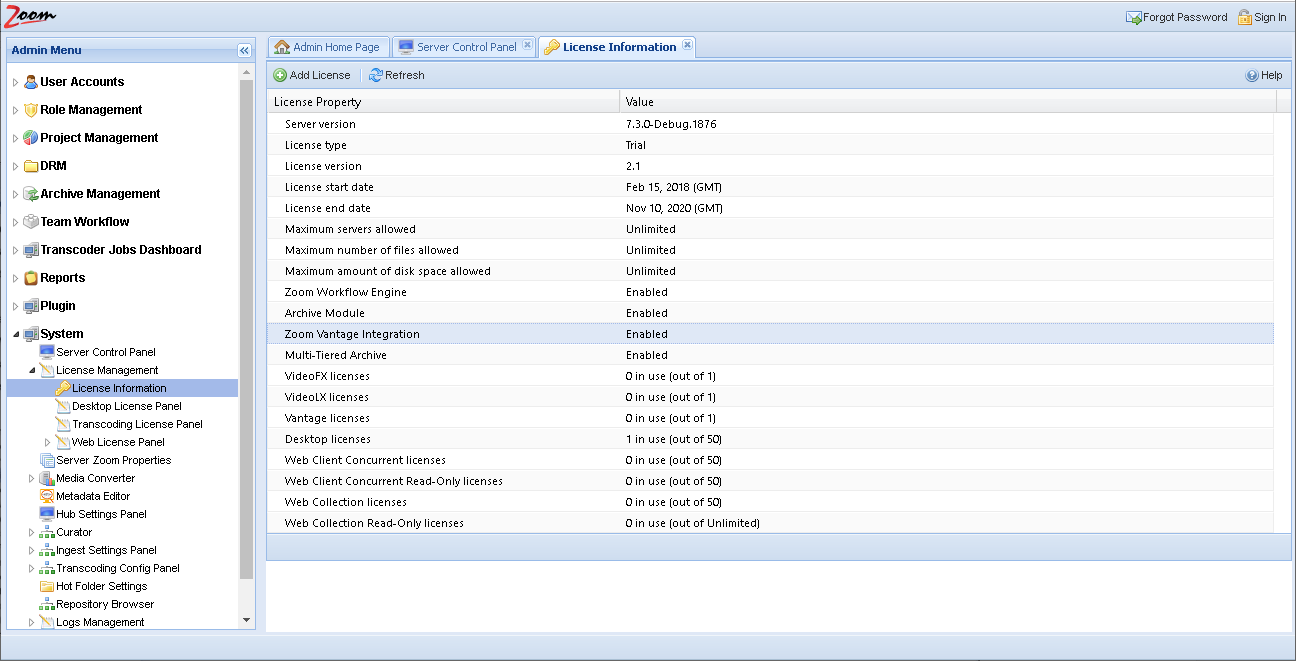
Check if you have the appropriate number of licenses required for VideoFX and Vantage. These licenses are shown in the Web Management Console.
In the Web Management Console, open the License Management node under the System node in the Admin Menu sidebar. Open License Information page. Check that Zoom Vantage Integration is Enabled. If it is not enabled, then check with Evolphin Support. Also, check that the counts for VideoFX licenses and Vantage license are as per your expectations, or check with Evolphin Support to get more licenses. You would need one VideoFX and Vantage license each for each location that would use VideoFX in your setup.
Set up shared network locations
VideoFX needs high-capacity storage on a network location to store the high-res, and sometimes also the mid-res files. This location should be accessible from all other components of the VideoFX system. Click here to know how to set up a third-party mount point. The common network location, PSAN, should be accessible on all machines in your VideoFX setup, including the Zoom MAM Server, the Ingest Server, the Transcoder, the Vantage machine, and all Zoom Clients. This location is called PSAN or Third Party Mount Point.
Another client-side location should be set up to be accessible to each individual Zoom Client using the VideoFX flow, the Zoom MAM Server, and the Ingest Server. This location is called USAN.
Define metadata schema
Set Ingest Rules
Location settings
We need to add the properties THIRD_PARTY_MOUNT_POINT and USAN_POINTS for any location that is configured for VideoFX.
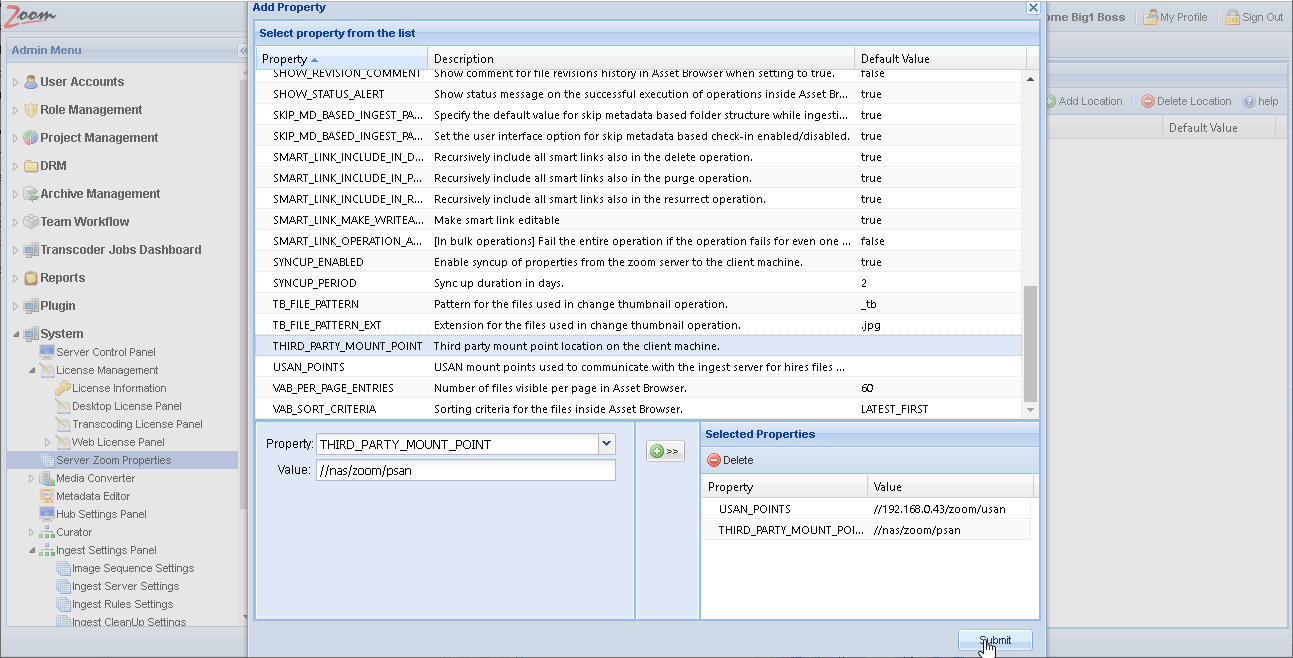
Specify the paths designated for each of them and click Submit to add these properties for our selected location.
Allocate licenses for locations
With multiple VideoFX and Vantage licenses, you could set up multiple locations in your Zoom setup as shown above. After setting up locations and their properties, you also need to specify which Zoom modules will be enabled for which location.
For setting up VideoFX using Vantage transcoding at a location, you need to assign a VideoFX and Vantage license each for that location. Similarly, you could also set up locations that have VideoFX without Vantage (using converters), or locations using VideoLX for transcoding.
Assign licenses for VideoFX
Set up SQL
To log and view the progress of the transcoding processes on various Transcoder machines, you need to configure a SQL database in the server control panel. If you do not have a Zoom script database set up already, then install and configure any SQL server like MySQL, and set up the schema for process reporting as described here.
Set up your Transcoder
You need a Transcoder for each location set up on your Zoom Server.
A Transcoder should be running an instance of Zoom Preview Server. If you are using your existing Preview Server as a Transcoder then you can skip Installing Zoom Preview Server on this Transcoder.
Register Transcoder with Zoom Server
You would need to register your Transcoders with your Zoom Server. Open the Ingest and Transcoding Service page: http://[TranscoderIP]:8873/review/transcoding/index.html (use 8973 when working with https) from anywhere on your network.
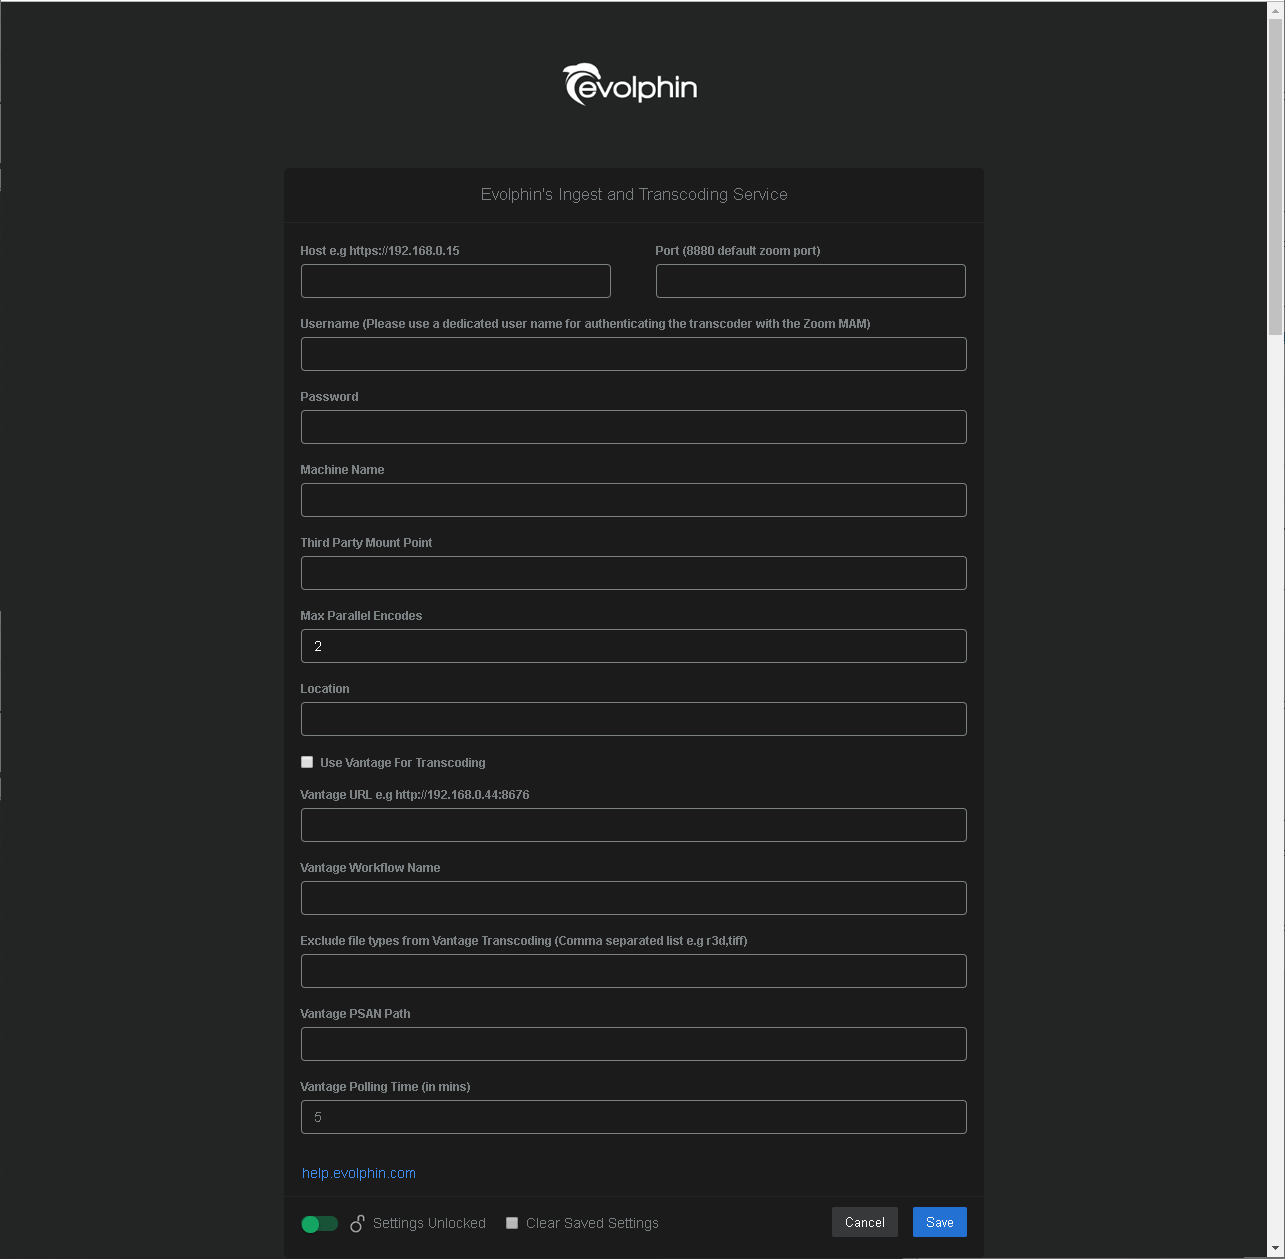
Host and Port: specify your Zoom Server hostname and the port on which the Zoom Server connects. Enter port 9880 if using SSL, otherwise, enter port 8880. If you use another port for the SSL connection on the Zoom Server, then specify that port value (the SSL port for your Zoom Server may be checked on the Zoom Server. Click here for more details about setting SSL ports)
Username and Password: specify Zoom user credentials that the transcoder will use to connect to the Zoom Server. This user should be used exclusively by this Transcoder Machine. It will consume a Zoom user license. Do not use your admin or personal user account as that will cause the authenticated session between the servers to be invalidated.
Machine Name: give a name for the Transcoder machine without using any spaces or special characters (!, @, #, %, $, & ,*, (, ), _, +).
Third Party Mount Point: specify the Third Party Mount Point Path. This path should be available or mounted on the Ingest server.
Max Parallel Encodes: specify the maximum number of encoding jobs allowed parallelly. The default value is 2.
Location: specify the Location name that was configured exclusively for this Transcoder.
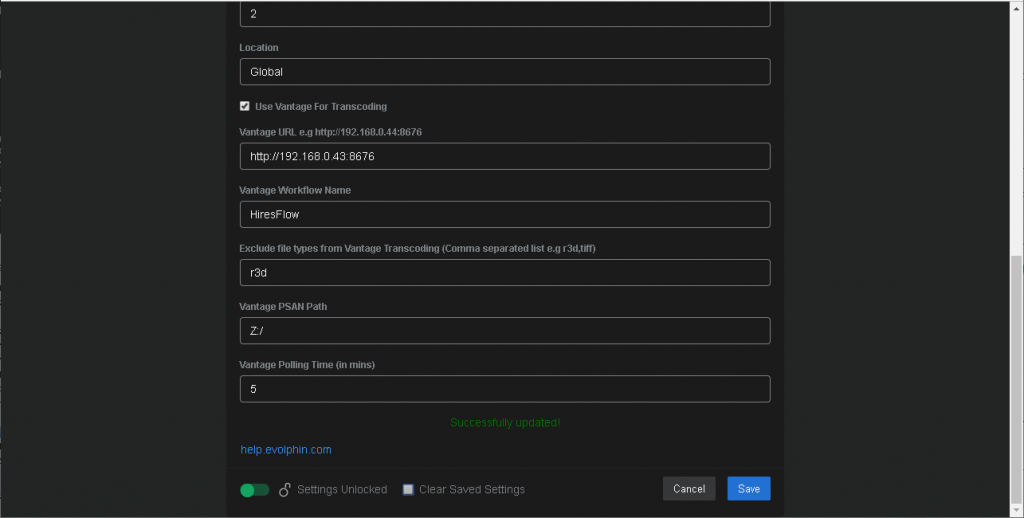
Use Vantage for Transcoding: enable this option if you want to transcode high-res files using a Vantage machine. The rest of the options are only enabled if you select this option.
Vantage URL: specify the URL of the Vantage machine.
Vantage Workflow Name: specify the workflow name that should be used while transcoding the jobs on the Vantage machine.
Exclude file types from Vantage Transcoding: specify the file types that should be excluded from Vantage transcoding. You can leave it blank if you want all types of high-res files to be transcoded by the Vantage machine.
Vantage PSAN Path: specify the PSAN path that the Vantage machine needs to use.
Vantage Polling Time: specify the Vantage Polling time period in minutes. This is the duration after which the Transcoder will check with the Vantage machine for the status of jobs.
Click Save. If the values are valid then these are saved. The Transcoder is registered with the Zoom Server and is ready to use.
This Transcoder will now be added to the Transcoding Settings page in the Web Management Console. Access the Transcoding Setting page from the Transcoding Config Panel in the System node in the Admin Menu sidebar.
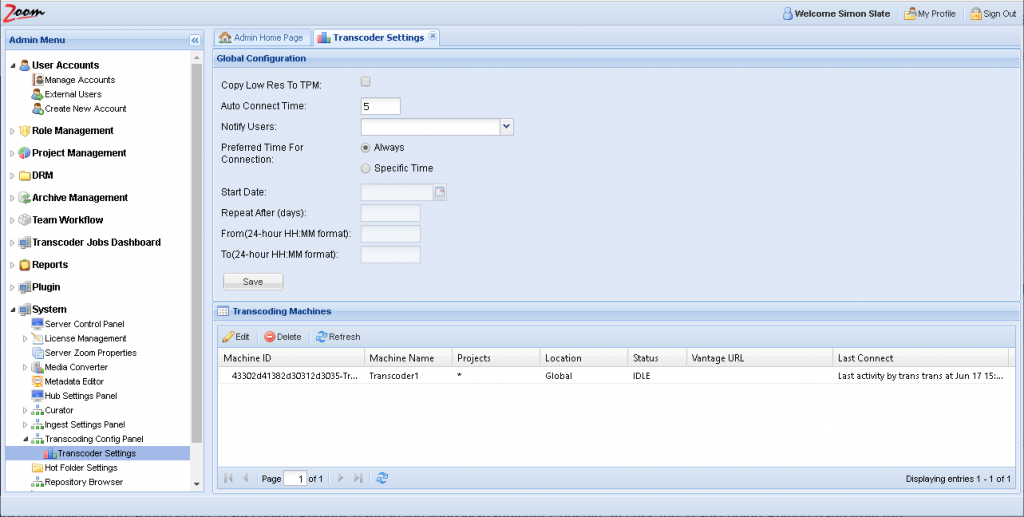
You can update the global settings for transcoders from this page. You can schedule the transcoders to only run at a specific time within a specific interval of days using the Preferred Time For Connection option. Update the desired values and click Save.
If any supplied value is not valid, then an error is displayed indicating the value is not validated.
Similarly, you can set up multiple Transcoder machines. You can also modify any Transcoder’s settings from this Ingest and Transcoding Service page or the Transcoder Settings in the Web Management Console.
Double-click on any transcoder listed in the Transcoding Machines box to open it for editing.
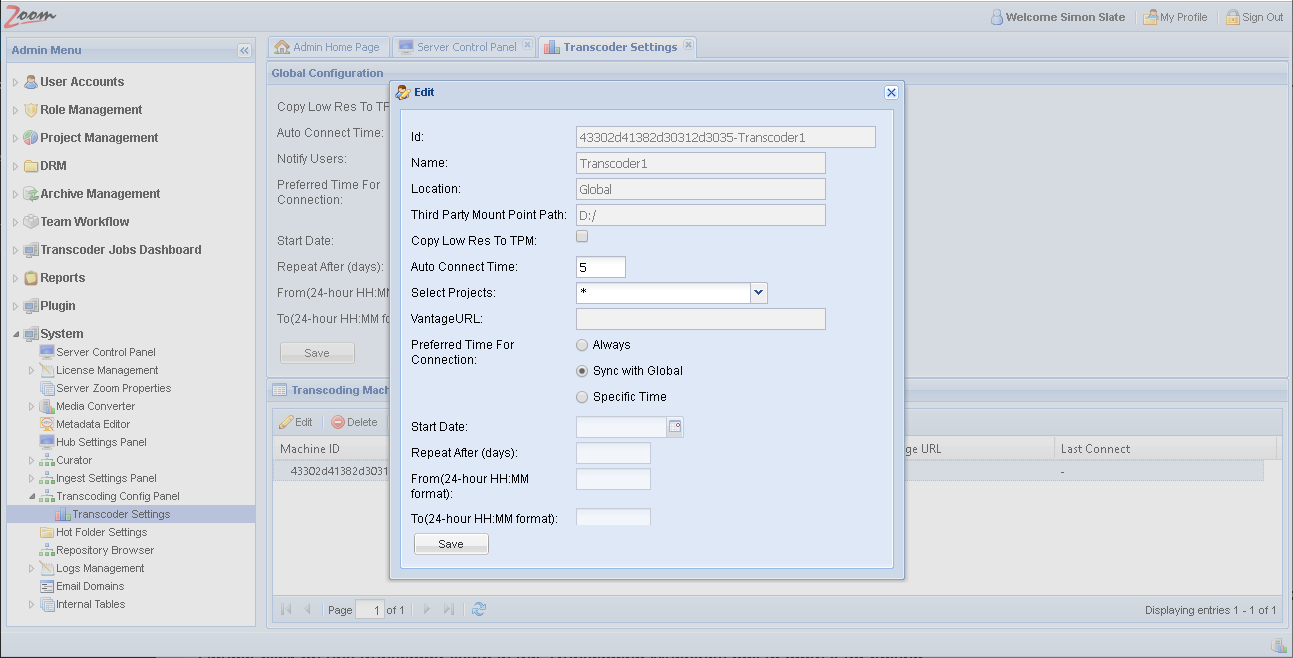
You can specify the projects which will use this transcoder for their transcoding jobs. You can also schedule this transcoder to run at a different preset time and frequency than the global settings. Modify the desired values and click Save.
Set up your Ingest Server
You need an Ingest Server for each location using VideoFX in your Zoom setup.
An Ingest Server should be running an instance of Zoom Preview Server. Typically, the Zoom Preview Server co-hosts the Ingest Service. If you are using your existing Zoom Preview Server to co-host the Ingest Service then you can skip Installing Zoom Preview Server on this Ingest Server.
After checking the Zoom Preview Service and TCP connection between your Zoom Server and Ingest Server, you need to register this Ingest Server with your Zoom Server.
Log into the Web Management Console as an admin. Open Ingest Settings Panel node under the System node. Now, open the Ingest Server Settings page under the Ingest Settings Panel node.
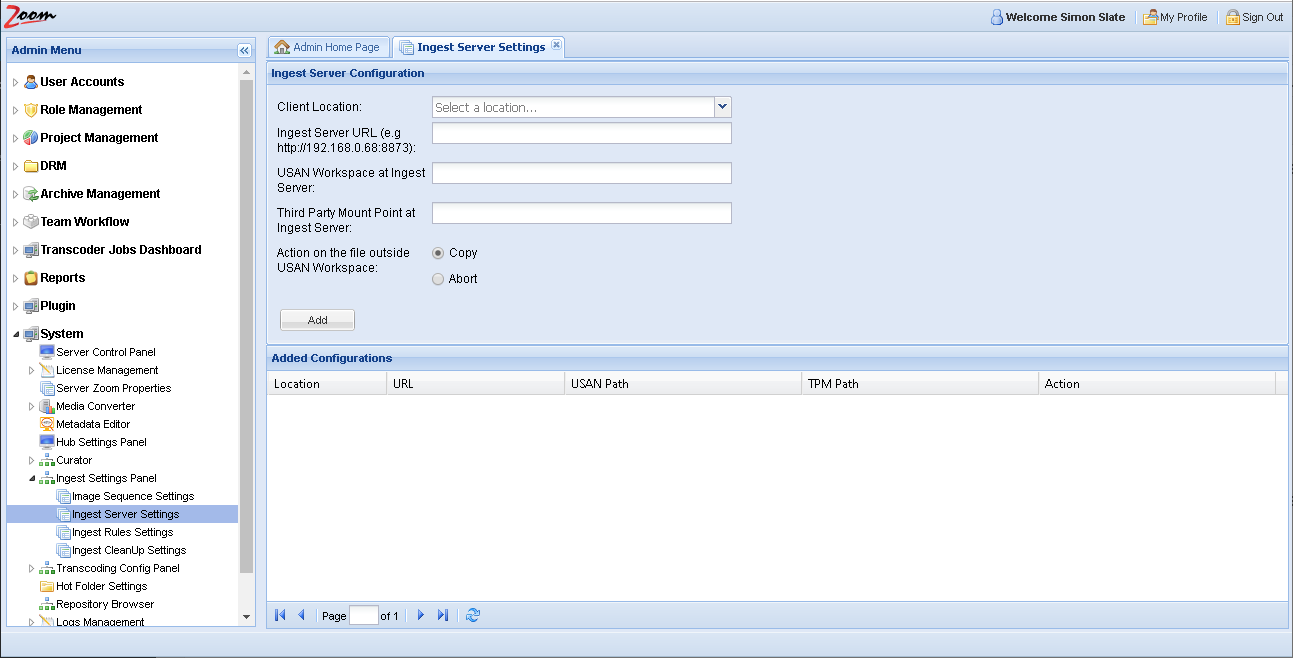
Specify the other fields as explained:
- Client Location: select the client location that will use this Ingest Server. This location should have VideoFX allocated under the Transcoding License Panel.
- Ingest Server URL: specify your Ingest Server’s URL that you have prepared by installing the Zoom Preview Server. The URL should use the appropriate protocol http or https as defined for your network along with the port allocated for Zoom web apps.
- USAN Workspace at Ingest Server: specify the USAN path for that location. This is the same path that was specified for this location in the Server Zoom Properties page as detailed in the Location settings section.
- Third Party Mount Point at Ingest Server: specify the Third Party Mount Point path for that location. This is the same path that was specified for this location in the Server Zoom Properties page as detailed in the Location settings section.
- Action on the file outside the USAN Workspace: select if you want to allow the VideoFX flow to work on files outside the USAN path or not. The option Copy will allow outside files in the VideoFX flow, while the Abort option will abort the VideoFX flow.
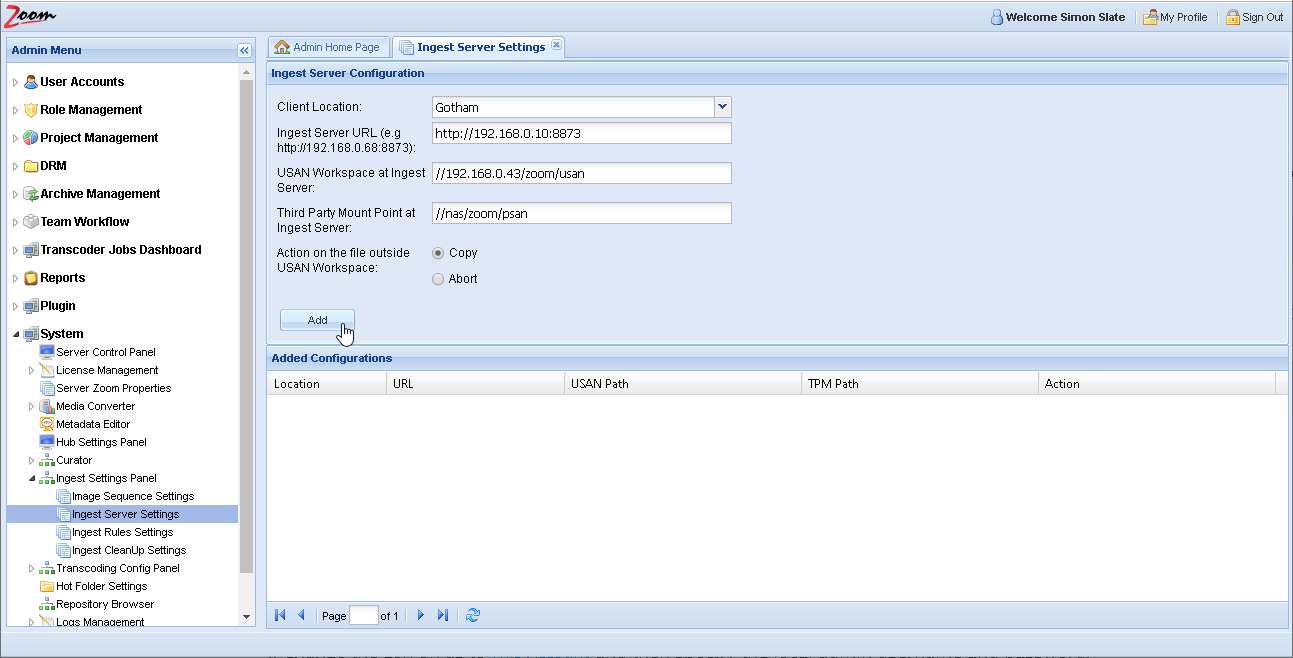
Specify the values and click Add to register this Ingest Server for the selected location.
Set up the Vantage machine
If you want to use Vantage to transcode your high-res files, then you need to set it up as per instructions from Telestream.
After you have set up shared network locations (for PSAN) on your Vantage machine and ensured that the Vantage machine is accessible from your Transcoder, create and validate Vantage workflows .
Set up your Zoom Clients
Follow ahead for Setting up Zoom Client for VideoFX to make use of VideoFX 2.0 flow.
Validate your VideoFX 2.0 setup
Follow this post to check if your VideoFX flow works as expected.