Curator Based Indexing and Searching
From Zoom 6.0 onwards, search speeds have enhanced using a dedicated index and search engine that ships with the Zoom Server installation package. This indexing service is called the Curator.
Curator was available with earlier Zoom versions too, only in a limited form – it was used for file-content searches only. Starting from Zoom 6.0, non-file content, like metadata, revision data, etc. can also be indexed and looked up quickly. Search operations, even with complex query parameters, are executed very fast, giving the end-users a very responsive search experience.
For versions prior to Zoom 6.0, refer to the article: File Content Search.
Upgrading from older versions to Zoom 6.x
If you are upgrading from an older version of Zoom to version 6.0 or above, then the existing Curator data indexes must be removed before proceeding. Follow these steps:
- On your Curator Server, stop Zoom Curator Service.
- Open server.xml for editing (Windows: [ZoomInstallDir]\conf\server.xml Linux: [ZoomInstallDir]/conf/server.xml).
- Find tag
<solrDataDir>inside<ftsSpec>. - Delete the value specified in the
<solrDataDir>tag.This value is the directory where the Curator Server stores its data. By deleting this value, all indexes will be removed. So, whenever next you will start the Curator Service, indexing will start from the beginning. - Save and close the file.
Starting the Curator Service in Zoom 6.x
- If it is a new server machine, install Zoom Server on this machine before proceeding further.
- If you have to use an existing server machine, choose any from your Zoom MAM Server or Preview Server.
On Linux:
- On your designated Curator Server, copy the
solr-server_init.d.shfrom theZoom_Installation_Directory/bin/directory to the/etc/init.d/directory. - Rename the newly copied file to
solr-server - Edit the
solr-serverfile in a text editor, if required, to ensure the values of the following 2 variables match the Zoom setup:ZOOM_HOME=Zoom_Installation_Directory; by defaultZOOM_HOME=/home/evolphin/zoomZOOM_USER=Service_Running_User; by defaultZOOM_USER=evolphin
- Open the Terminal and issue the following commands as the root user:
chkconfig --add solr-serverchkconfig --listEnsure that the
solr-serverservice is listed in the output of the second command.
- Now the Curator service can be controlled, like other Zoom Services, with the following commands on the Linux Terminal:
service solr-server status(Check the status of Curator service)service solr-server start(Start the Curator service)service solr-server stop(Stop the Curator service)service solr-server restart(Restart Curator service)
On Windows:
- On your designated Curator Server, open Windows Command Prompt.
- cd to the directory
Zoom_Installation_Directory/bin/ - The Curator service can be installed as a Windows service using the following command:
solrserver install
- After the service installation, Zoom Solr Service can be controlled (start, stop, restart etc.), like other Zoom services, from the Windows Services Manager or Task Manager.
- Alternatively, the Curator service can be controlled using the following commands, from the Command Prompt:
solrserver start(Start the Curator service)solrserver stop(Stop the Curator service)solrserver restart(Restart the Curator service)
- To uninstall Curator as a Windows services, use the following command in the Command Prompt:
solrserver remove
Starting the Curator Service for Zoom versions till 7.2
- If it is a new server machine, install Zoom Server on this machine before proceeding further.
- If you have to use an existing server machine, choose any from your Zoom MAM Server or Preview Server.
On Linux:
- On your designated Curator Server, copy the
curator-server_init.d.shfrom theZoom_Installation_Directory/bin/directory to the/etc/init.d/directory. - Rename the newly copied file to
curator-server - Edit the
curator-serverfile in a text editor, if required, to ensure the values of the following 2 variables match the Zoom setup:ZOOM_HOME=Zoom_Installation_Directory; by defaultZOOM_HOME=/home/evolphin/zoomZOOM_USER=Service_Running_User; by defaultZOOM_USER=evolphin
- Open the Terminal and issue the following commands as the root user:
chkconfig --add curator-serverchkconfig --list
Ensure that the
curator-serverservice is listed in the output of the second command. - Now the Curator service can be controlled, like other Zoom Services, with the following commands on the Linux Terminal:
service curator-server status(Check the status of Curator service)service curator-server start(Start the Curator service)service curator-server stop(Stop the Curator service)service curator-server restart(Restart Curator service)
On Windows:
- On your designated Curator Server, open Windows Command Prompt.
- cd to the directory
Zoom_Installation_Directory/bin/ - Install the Curator as a Windows service using the following command:
curatorserver install
- After the service installation, Zoom Curator Service can be controlled (start, stop, restart, etc.), like other Zoom services, from the Windows Services Manager or Task Manager.
- Alternatively, the Curator service can be controlled using the following commands, from the Command Prompt:
curatorserver start(Start the Curator service)curatorserver stop(Stop the Curator service)curatorserver restart(Restart the Curator service)
curatorserver removeFirst-time configuration
These steps are for Curator configuration in a non-HADR setup. For Curator configuration on a Zoom HADR setup, refer to the article on Setup of Curator with HADR.
These additional initial configuration steps are only needed if the Curator service is being set up on a machine separate from the Zoom MAM Server. If the Curator is installed on the same machine as the Zoom MAM Server, then skip to the next section.
- On the Zoom MAM Server, stop services for Zoom (all Zoom services installed on the machine). The order to stop services is Zoom Curator, Zoom Preview, Zoom, and then Zoom HADR services.
- Open server.xml for editing (Windows: [ZoomInstallDir]\conf\ and Linux: [ZoomInstallDir]/conf/).
- Locate the tag <ftsSpec>.
- Inside the <ftsSpec> tag, set host tag value to Curator Server’s hostname or IP address. e.g. <host>zm04.company.com<host>
- Set solrDataDir tag value to the Curator Server’s database directory; see below for a detailed description. Curator Server’s database directory is recommended to be kept on a file-system that provides fast disk access, like local SSD drives, fiber-channel connected drives, etc.
- Save the file.
- Start services for Zoom (the order to start services is Zoom HADR, Zoom, Zoom Preview, and then Zoom Curator services).
- On the Curator Server, stop services for Zoom (all Zoom services installed on the machine). The order to stop services is Zoom Curator, Zoom Preview, Zoom, and then Zoom HADR services.
- Copy
server.xmlfile edited above from the Zoom Server to the Curator Server‘s conf folder (Windows: [ZoomInstallDir]\conf\ and Linux: [ZoomInstallDir]/conf/). Alternatively, edit theserver.xmlfile on the Curator Server in the same manner as above, by setting values for Curator Server’s IP, Curator’s database directory and also Zoom Server’s IP and port. Save the file. - Start services for Zoom on this Curator Server (the order to start services is Zoom HADR, Zoom, Zoom Preview, and then Zoom Curator services).
- Configure the remaining Curator parameters from the Zoom Web Management Console on the Curator Server. See the next section for steps.
Configuration using Zoom Web Management Console
- Open your Zoom Web Management Console in a web browser. Sample URL for the Web Management Console is
http://localhost:8443/ - Open Server Control Panel from the System node in the Admin Menu sidebar.
- Open Curator-based Search Management from the server control panel options.
- The four checkboxes on top of the Curator configuration window are for controlling the indexes. Change the parameters as described below.

The configurable parameters are:
File Content Index: Check to enable indexing of the contents of assets.File Content Search: Check to enable full-text search on the contents of assets.Non-File Content Index: Check to enable indexing of properties of assets (like file name, metadata etc.).Non-File Content Search: Check to enable full-text search on non-content data of assets (like file name, metadata etc.).If Curator-based search is being enabled after a large number of assets are already present in the Zoom repository, then the initial indexing of the existing assets may take a long duration. It is recommended that only theIndexingflag(s) are enabled initially without enabling the correspondingSearchflag(s). This will prevent any disruptions to searches done by users while the indexing is going on. Once the initial indexing is complete, then theSearchflag(s) can also be enabled. See this post about how to check Curator’s global indexing status.Audit log Index: Check to enable indexing of audit log files (this is only available from Zoom 7.0 onwards).Port: This is the port on which the Curator service runs. The default value is 8983.Log Level: This is the logging level used for Curator logs. The default value is INFO.Commit Frequency (ms): Enter the frequency (in milliseconds) with which the Curator Server will check for new indexes and then commit unsaved data to disk.Solr Data Dir: This is the path to the Solr database where the indexing information of the Zoom repository files is stored. The default value is [ZoomInstallDir]/db/solr-db.The Solr Data Dir cannot be changed if the directory is no longer empty. That is, it cannot be changed after the first file gets indexed successfully.Solr Base Context: This is the URL append for accessing Curator Server.Failed Documents Notification: This is the frequency for sending reports to super-admins about indexing failures. It can be set to daily, hourly, weekly, or, disable. The default value is daily.
The other parameters are either non-configurable or, do not usually require any change for the curator. Additional details about these options are in the section Advanced Curator configuration.
Whenever new data is submitted in the Curator-based Search Management form of the Server Control Panel, the submitted details are first sent from Zoom to Curator for verification and are saved only when these values are accepted.
The communication between Zoom and Curator to establish the correctness of input parameters could be slow on certain setups.
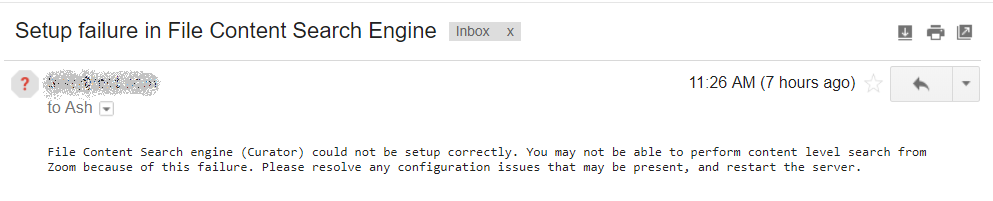
In Zoom 7.0, when any Curator parameters are changed and saved in the Web Management Console, an email is sent out to the email address(es) set-up to receive Zoom notifications. This is a warning message sent as a reminder to check that the new configuration settings work. You should ignore this message. Here is the sample email message:
Configuring File-types for Content Search
The file-types, for which content indexing and searching is available, are all listed in the IndexableFileType.properties file, present in the conf folder (Windows: [ZoomInstallDir]\conf Linux: [ZoomInstallDir]/conf).
Administrators can add any file-type extension in this file to enable content indexing for that file-type. Removing an entry from this properties file will cause that file-type to be excluded from indexing from then on.
Indexing of the JSON, CSV, and XML file formats is performed as plain text files.
From Zoom 6.0 onwards, file content searching is not restricted to any specific set of languages by default.
Partial Content Search
On searching for a particular word, all files containing the input word in full or as part of another word will be returned as matches.
Phrase Search or Exact Match Search
To search for an exact phrase or word, enclose it with quotes – ” “.
Special Character Support
List of Unsupported Special Characters for “Search Everywhere” in Asset Browser
# < >
List of Special Characters for “Advanced Search” in Asset Browser
The Asset Browser’s Advanced Search supports regular-expression search (with shell wild-card *). So when non-content search is enabled, if the following special characters need to be searched literally, devoid of their regular-expression meaning, they must be prefixed with a \.
& < > \ { } # +
e.g. text\# \<tag\>
Advanced Configuration
If you encounter out of memory exceptions, then increase the Java heap size in conf/solr-server.conf inside the Zoom_Installation_Directory.wrapper.java.additional.9=-Xmx2g
Here 2g represents 2GB RAM; increase this value accordingly.
If you encounter PERFORMANCE WARNING error often in bin/logs/solr.log, you can increase the number of maxWarmingSearchers. Do this only when confident of the available system resources (RAM, CPU, etc…).
Update the count <maxWarmingSearchers>2</maxWarmingSearchers> in conf/solr-core/ID/conf/solrconfig.xml file inside the Zoom_Installation_Directory.